Create a Bun service in Zerops
Zerops provides a powerful Bun runtime service with extensive build support. The Bun runtime is highly scalable and customizable to suit your development and production needs. With just a few clicks or commands, you can have a production-ready Bun environment up and running in no time.
Create a Bun service using Zerops GUI
First, set up a project in the Zerops GUI. Then go to the project dashboard page and choose Add new service in the left menu under the Services section. From there, you can add a new Bun service:
Choose a Bun version
Zerops supports the following Bun versions:
- 1.2
- 1.1.34 (Ubuntu only)
- nightly
- canary
You can easily upgrade the major version at any time later.
Set a hostname
Enter a unique service identifier like "app", "cache", "gui", etc. Duplicate services with the same name within the same project are not allowed.
Limitations:
- Maximum 25 characters
- Must contain only lowercase ASCII letters (a-z) or numbers (0-9)
The hostname is fixed after the service is created and cannot be changed later.
Set secret environment variables
Add environment variables with sensitive data, such as passwords, tokens, salts, certificates, etc. These will be securely saved inside Zerops and added to your runtime service upon start.
Setting secret environment variables is optional. You can always set them later in the Zerops GUI.
Read more about the different types of environment variables in Zerops.
Configure auto scaling
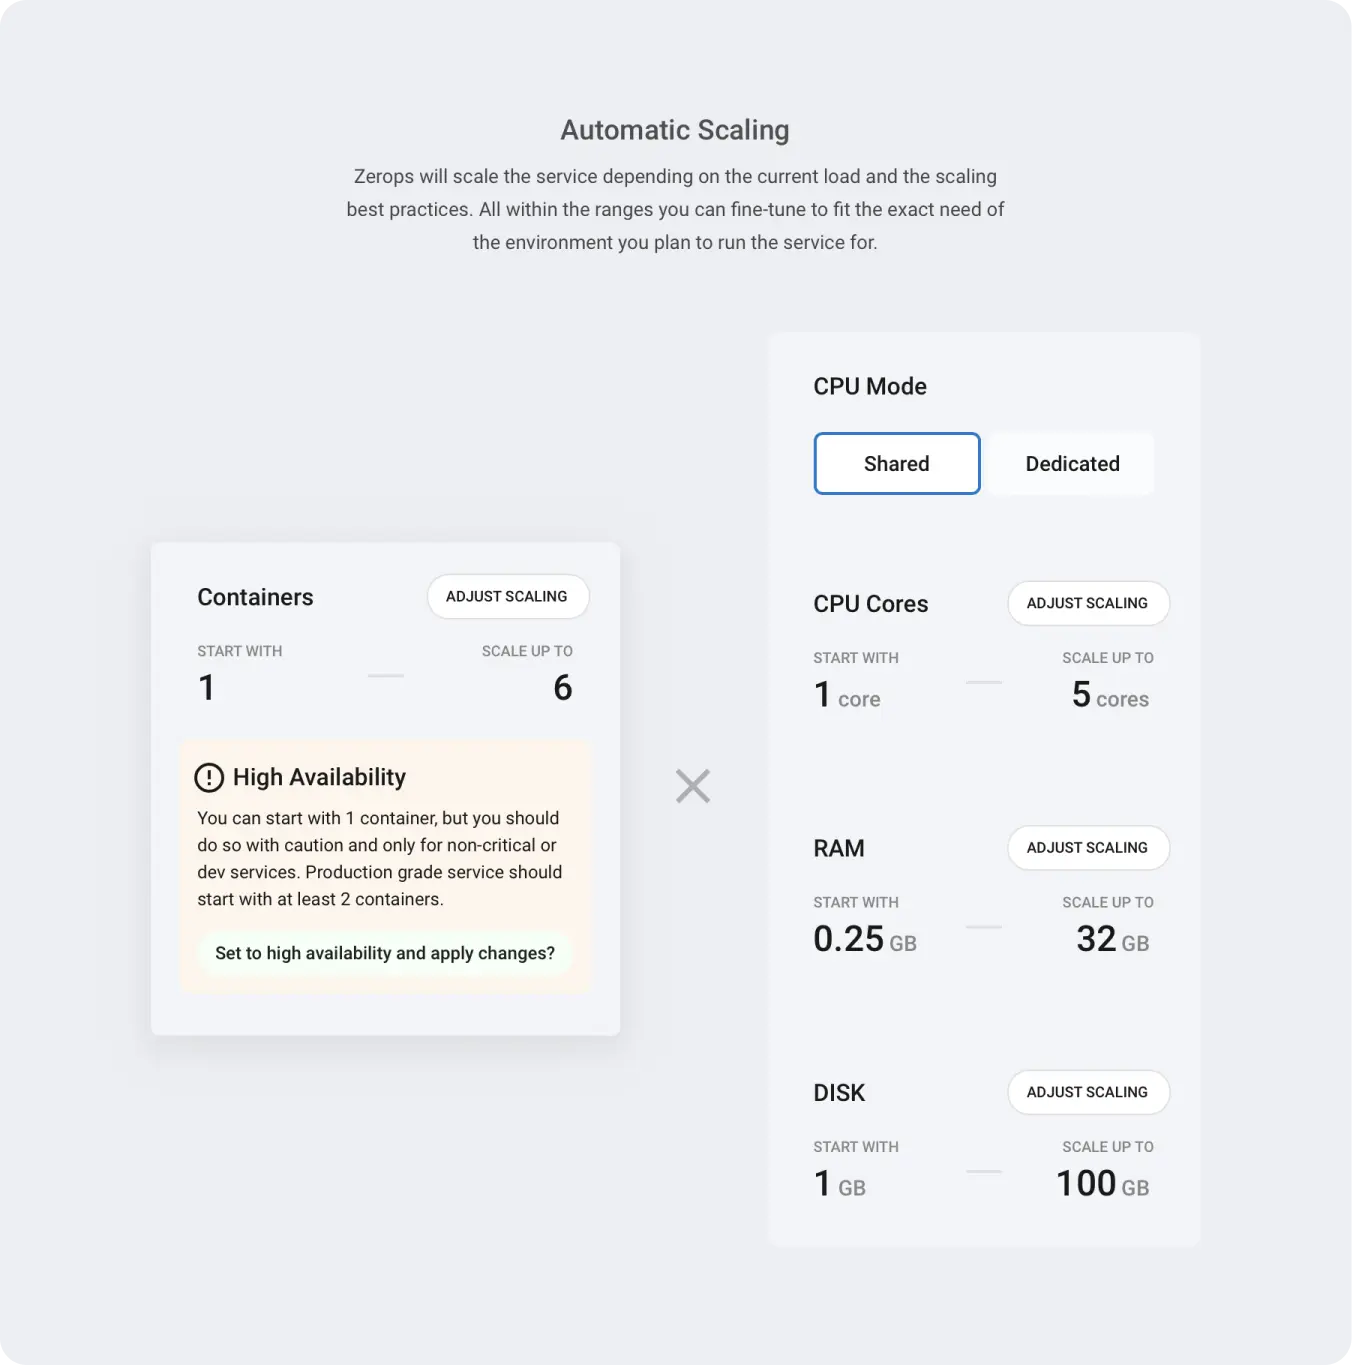
Zerops automatically scales Bun services both vertically and horizontally. Configure the scaling parameters to match your application's needs and control costs.

Quick Configuration
CPU Mode: Choose between shared (cost-effective) or dedicated (consistent performance).
Resource Limits: Set minimum and maximum resources for CPU, RAM, and disk to control costs and ensure performance.
Advanced Resource Settings: Beyond the basic limits, Zerops provides additional scaling parameters for fine-tuning performance:
- Start CPU cores - Allocate extra CPU power during application startup
- RAM thresholds - Prevent out-of-memory crashes with custom buffer settings
- CPU scaling thresholds (dedicated mode) - Control when scaling is triggered
These settings can significantly improve application performance and reliability. See the scaling guides below for detailed configuration options.
Container Limits: Configure horizontal scaling from 1 to 10 containers.
- Single container (max = 1): Cost-effective for development, but no high availability
- Multiple containers (max > 1): High availability for production, requires stateless application design
For detailed scaling configuration, troubleshooting, and best practices, see:
- How Zerops scales Bun - Service-specific scaling guide
- Automatic Scaling and High Availability - Complete technical details
- Zerops Pricing - Cost differences between CPU modes and resource usage rates
Create a Bun service using zCLI
zCLI is the Zerops command-line tool. To create a new Bun service via the command line, follow these steps:
- Install & setup zCLI
- Create a project description file
- Create a project with a Bun and PostgreSQL service
Create a project description file
Zerops uses a YAML format to describe the project infrastructure.
Basic example:
Create a directory called my-project. Inside the my-project directory, create a description.yaml file with the following content:
# basic project data
project:
  # project name
  name: my-project
# array of project services
services:
  - # service name
    hostname: app
    # service type and version number in Bun@{version} format
    type: bun@latest
    # defines the minimum number of containers for horizontal autoscaling
    minContainers: 1
    # defines the maximum number of containers for horizontal autoscaling. Max value = 6.
    maxContainers: 6
    # optional: create env variables
    envSecrets:
      S3_ACCESS_KEY_ID: 'P8cX1vVVb'
      S3_ACCESS_SECRET: 'ogFthuiLYki8XoL73opSCQ'
The yaml file describes your future project infrastructure. The project will contain one Bun service with default auto scaling configuration. Hostname will be set to "app", the internal port(s) the service listens on will be defined later in the zerops.yaml. Following secret env variables will be configured:
Full example:
Create a directory my-project. Create an description.yaml file inside the my-project directory with following content:
# basic project data
project:
  # project name
  name: my-project
  # optional: project description
  description: A project with a Bun and PostgreSQL database
  # optional: project tags
  tags:
    - DEMO
    - ZEROPS
# array of project services
services:
  - # service name
    hostname: app
    # service type and version number in Bun@{version} format
    type: bun@latest
    # optional: vertical auto scaling customization
    verticalAutoscaling:
      cpuMode: DEDICATED
      minCpu: 2
      maxCpu: 5
      minRam: 2
      maxRam: 24
      minDisk: 6
      maxDisk: 50
      startCpuCoreCount: 3
      minFreeRamGB: 0.5
      minFreeRamPercent: 20
    # defines the minimum number of containers for horizontal autoscaling. Max value = 6.
    minContainers: 2
    # defines the maximum number of containers for horizontal autoscaling. Max value = 6.
    maxContainers: 4
    # optional: create env variables
    envSecrets:
      S3_ACCESS_KEY_ID: 'P8cX1vVVb'
      S3_ACCESS_SECRET: 'ogFthuiLYki8XoL73opSCQ'
  - # second service hostname
    hostname: db
    # service type and version number in postgresql@{version} format
    type: postgresql@12
    # mode of operation "HA"/"non_HA"
    mode: NON_HA
The yaml file describes your future project infrastructure. The project will contain a Bun service and a PostgreSQL service.
Bun service with "app" hostname, the internal port(s) the service listens on will be defined later in the zerops.yaml. Bun service will run with custom vertical and horizontal scaling. Following secret env variables will be configured:
The hostname of the PostgreSQL service will be set to "db". The single container(/features/scaling#deployment-modes-databases-and-shared-storage) mode will be chosen and the default auto scaling configuration will be set.
Description of description.yaml parameters
The project: section is required. Only one project can be defined.
| Parameter | Description | Limitations |
|---|---|---|
| name | The name of the new project. Duplicates are allowed. | |
| description | Optional. Description of the new project. | Maximum 255 characters. |
| tags | Optional. One or more string tags. Tags do not have a functional meaning, they only provide better orientation in projects. |
At least one service in services: section is required. You can create a project with multiple services. The example above contains Bun and PostgreSQL services but you can create a description.yaml with your own combination of services.
| Parameter | Description |
|---|---|
| hostname | The unique service identifier.
|
| type | Specifies the service type and version. See what Bun service types are currently supported. |
| verticalAutoscaling | Optional. Defines custom vertical auto scaling parameters. |
| - cpuMode | Optional. Accepts |
| - minCpu/maxCpu | Optional. Set the minCpu or maxCpu in CPU cores (integer). |
| - minRam/maxRam | Optional. Set the minRam or maxRam in GB (float). |
| - minDisk/maxDisk | Optional. Set the minDisk or maxDisk in GB (float). |
| minContainers | Optional. Default = 1. Defines the minimum number of containers
for horizontal autoscaling. Limitations: Current maximum value = 10. |
| maxContainers | Defines the maximum number of containers for horizontal autoscaling. Limitations: Current maximum value = 10. |
| envSecrets | Optional. Defines one or more secret env variables as a key value map. See env variable restrictions. |
Create a project based on the description.yaml
When you have your description.yaml ready, use the zcli project project-import command to create a new project and the service infrastructure.
Usage:
  zcli project project-import importYamlPath [flags]

Flags:
  -h, --help                Help for the project import command.
      --org-id string        If you have access to more than one organization, you must specify the org ID for which the
                            project is to be created.
      --working-dir string   Sets a custom working directory. Default working directory is the current directory. (default "./")
Zerops will create a project and one or more services based on the description.yaml content.
Maximum size of the description.yaml file is 100 kB.
You don't specify the project name in the zcli project project-import command, because the project name is defined in the description.yaml.
If you have access to more than one client, you must specify the client ID for which the project is to be created. The clientID is located in the Zerops GUI under the client name on the project dashboard page.

Add Bun service to an existing project
Example:
Create a directory my-project if it doesn't exist. Create an import.yaml file inside the my-project directory with following content:
# basic project data
project:
  # project name
  name: my-project
# array of project services
services:
  - # service name
    hostname: app
    # service type and version number in Bun@{version} format
    type: bun@latest
    # defines the minimum number of containers for horizontal autoscaling
    minContainers: 1
    # defines the maximum number of containers for horizontal autoscaling. Max value = 6.
    maxContainers: 6
    # optional: create env variables
    envSecrets:
      S3_ACCESS_KEY_ID: 'P8cX1vVVb'
      S3_ACCESS_SECRET: 'ogFthuiLYki8XoL73opSCQ'
The yaml file describes the list of one or more services that you want to add to your existing project. In the example above, one Bun service with default auto scaling configuration will be added to your project. Hostname of the new service will be set to app. Following secret env variables will be configured:
The content of the services: section of import.yaml is identical to the project description file. The import.yaml never contains the project: section because the project already exists.
When you have your import.yaml ready, use the zcli project service-import command to add one or more services to your existing Zerops project.
zCLI commands are interactive, when you press enter after zcli project service-import importYamlPath, you will be given a list of your projects to choose from.
Maximum size of the import.yaml file is 100 kB.