Build & deploy pipeline
Configure the pipeline
Zerops provides a customizable build and runtime environment for your application. Start by adding a zerops.yaml file to the root of your repository and modify it to fit your application.
Here is a basic example for a Node.js application:
The zerops.yaml in your repository tells Zerops how to build and deploy your application. When the build & deploy pipeline triggers for the Node.js service named api, Zerops will:
- Create a build environment with Node.js v.20 preinstalled
- Run build commands:
npm i,npm run build - Create a runtime environment with Node.js v.20 preinstalled
- Deploy the built artifact from the
./distfolder to runtime containers - Cache the
./node_modulesfolder for faster subsequent builds - Start your application using
npm start
Learn more about zerops.yaml parameters for your runtime:
Trigger the pipeline
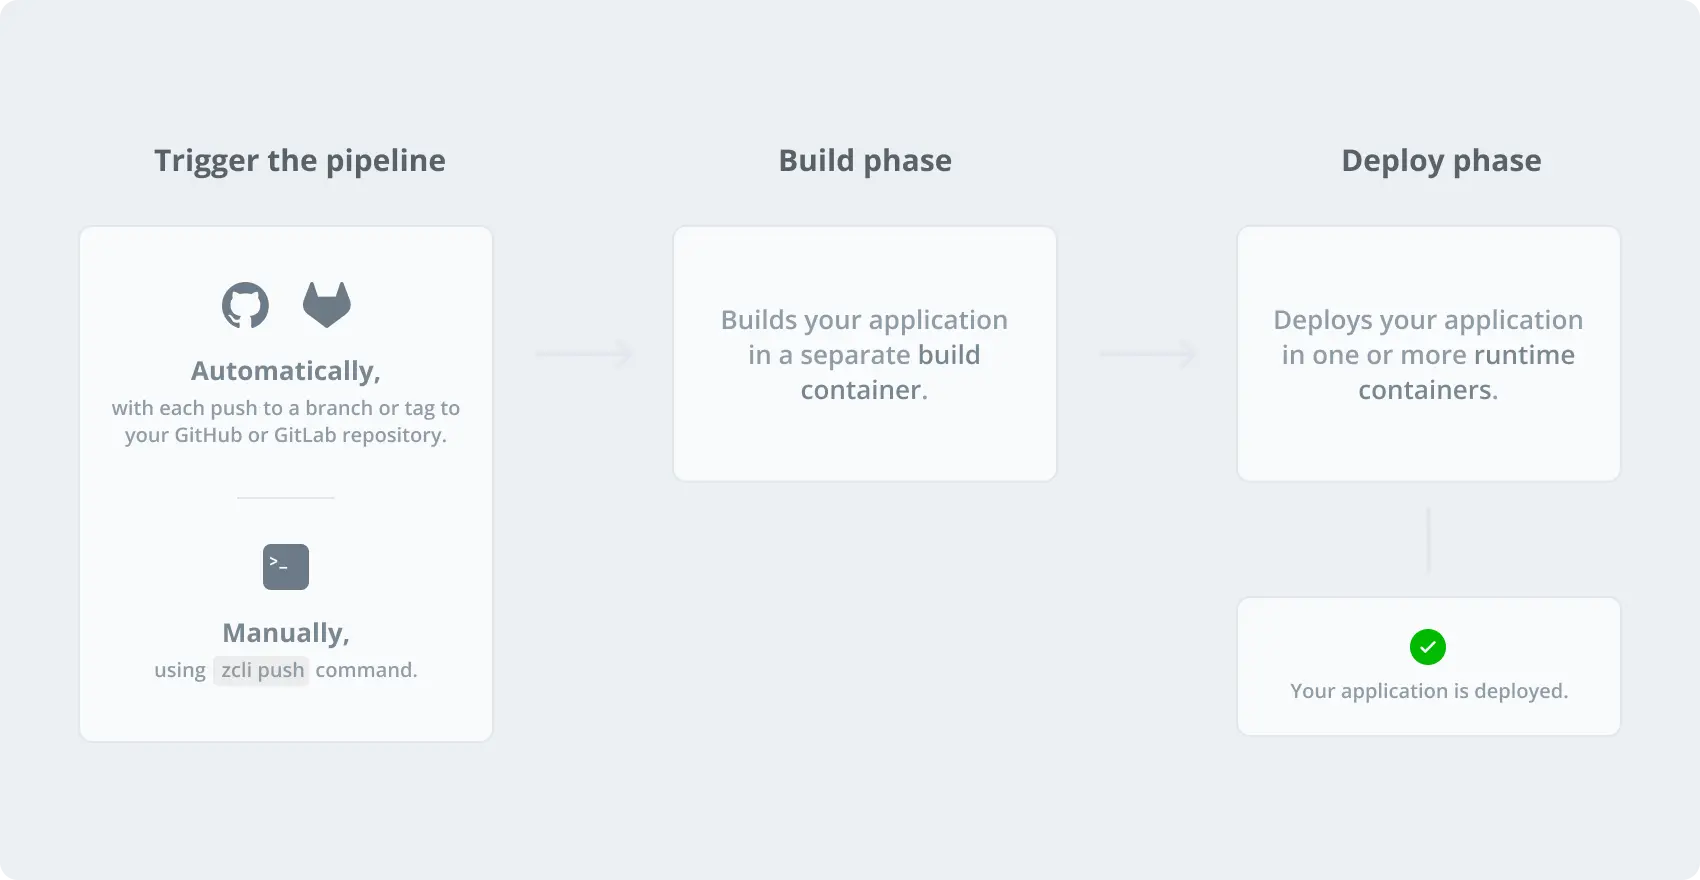
Continuous deployment
Set up automatic builds triggered by Git events. You can establish continuous deployment in two ways:
- New Service: Create a new runtime service and connect it to your GitHub or GitLab repository during the service creation process.
- Existing Services: Go to the service detail and choose Pipelines & CI/CD settings from the left menu. Click Connect with a GitHub repository or Connect with a GitLab repository to link your repository.
Once connected, Zerops will automatically build and deploy your application with each push to the selected branch or when you create a new tag.
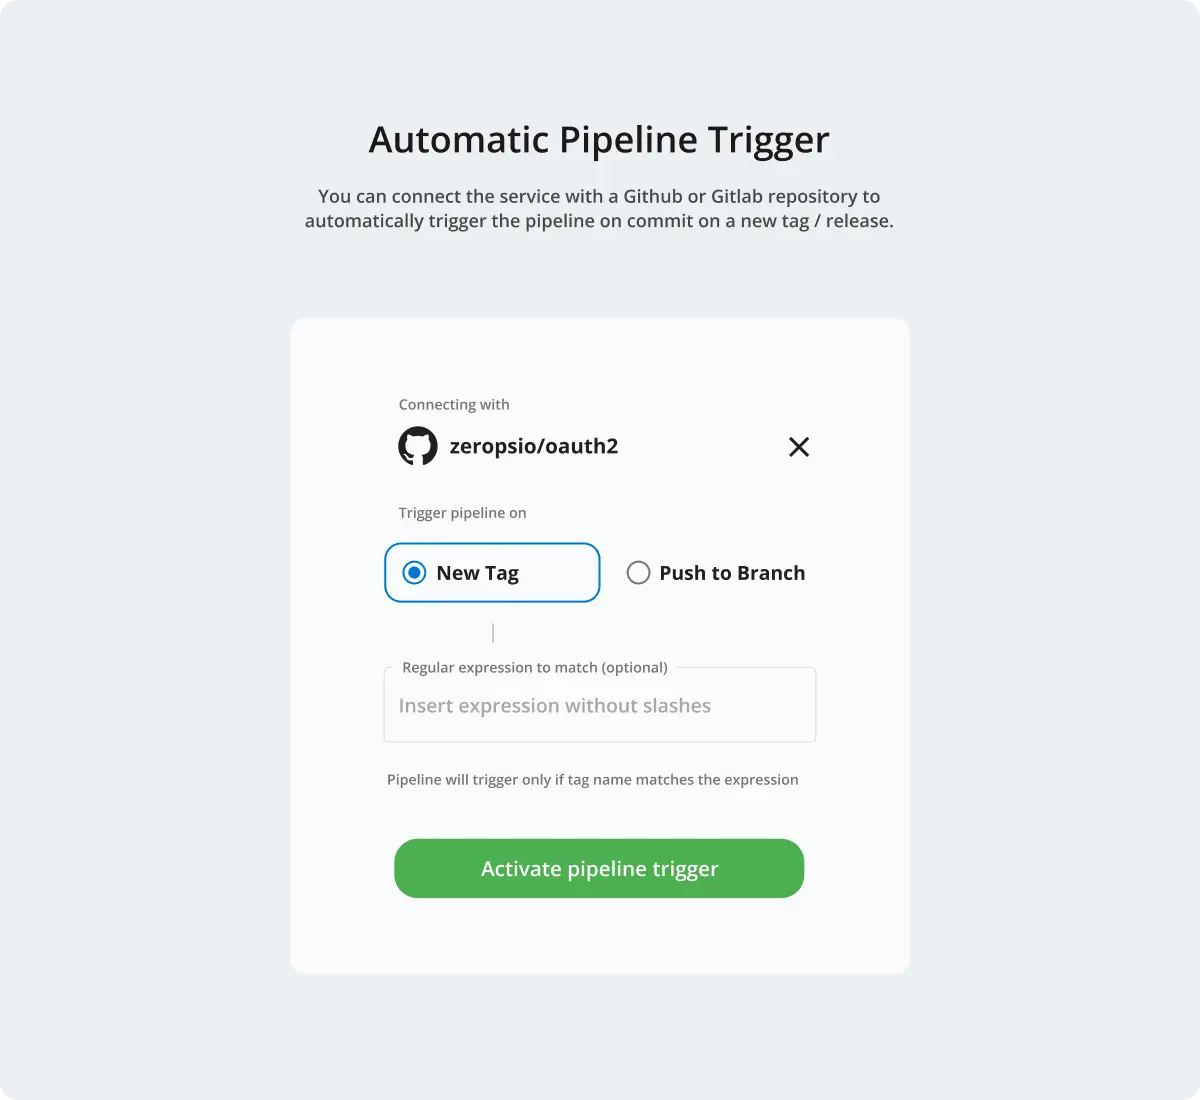 Github Integration via Zerops GUI
On-demand deployment
Trigger builds and deployments manually when needed using either the CLI or GUI.
Using Zerops CLI
- Build and deploy:
zcli service push- Uploads code and triggers the full pipeline - Deploy only:
zcli service deploy- Skips build, deploys pre-built artifacts
See CLI commands documentation for all parameters.
Using Zerops GUI
In Pipelines & CI/CD settings section of your service detail:
- Re-deploy last pipeline - With optional secret env variable updates
- Trigger new pipeline - From git repo or with custom configuration
Using import YAML
Add buildFromGit: <repo-url> to your service configuration for one-time build during import. See import documentation.
Build phase
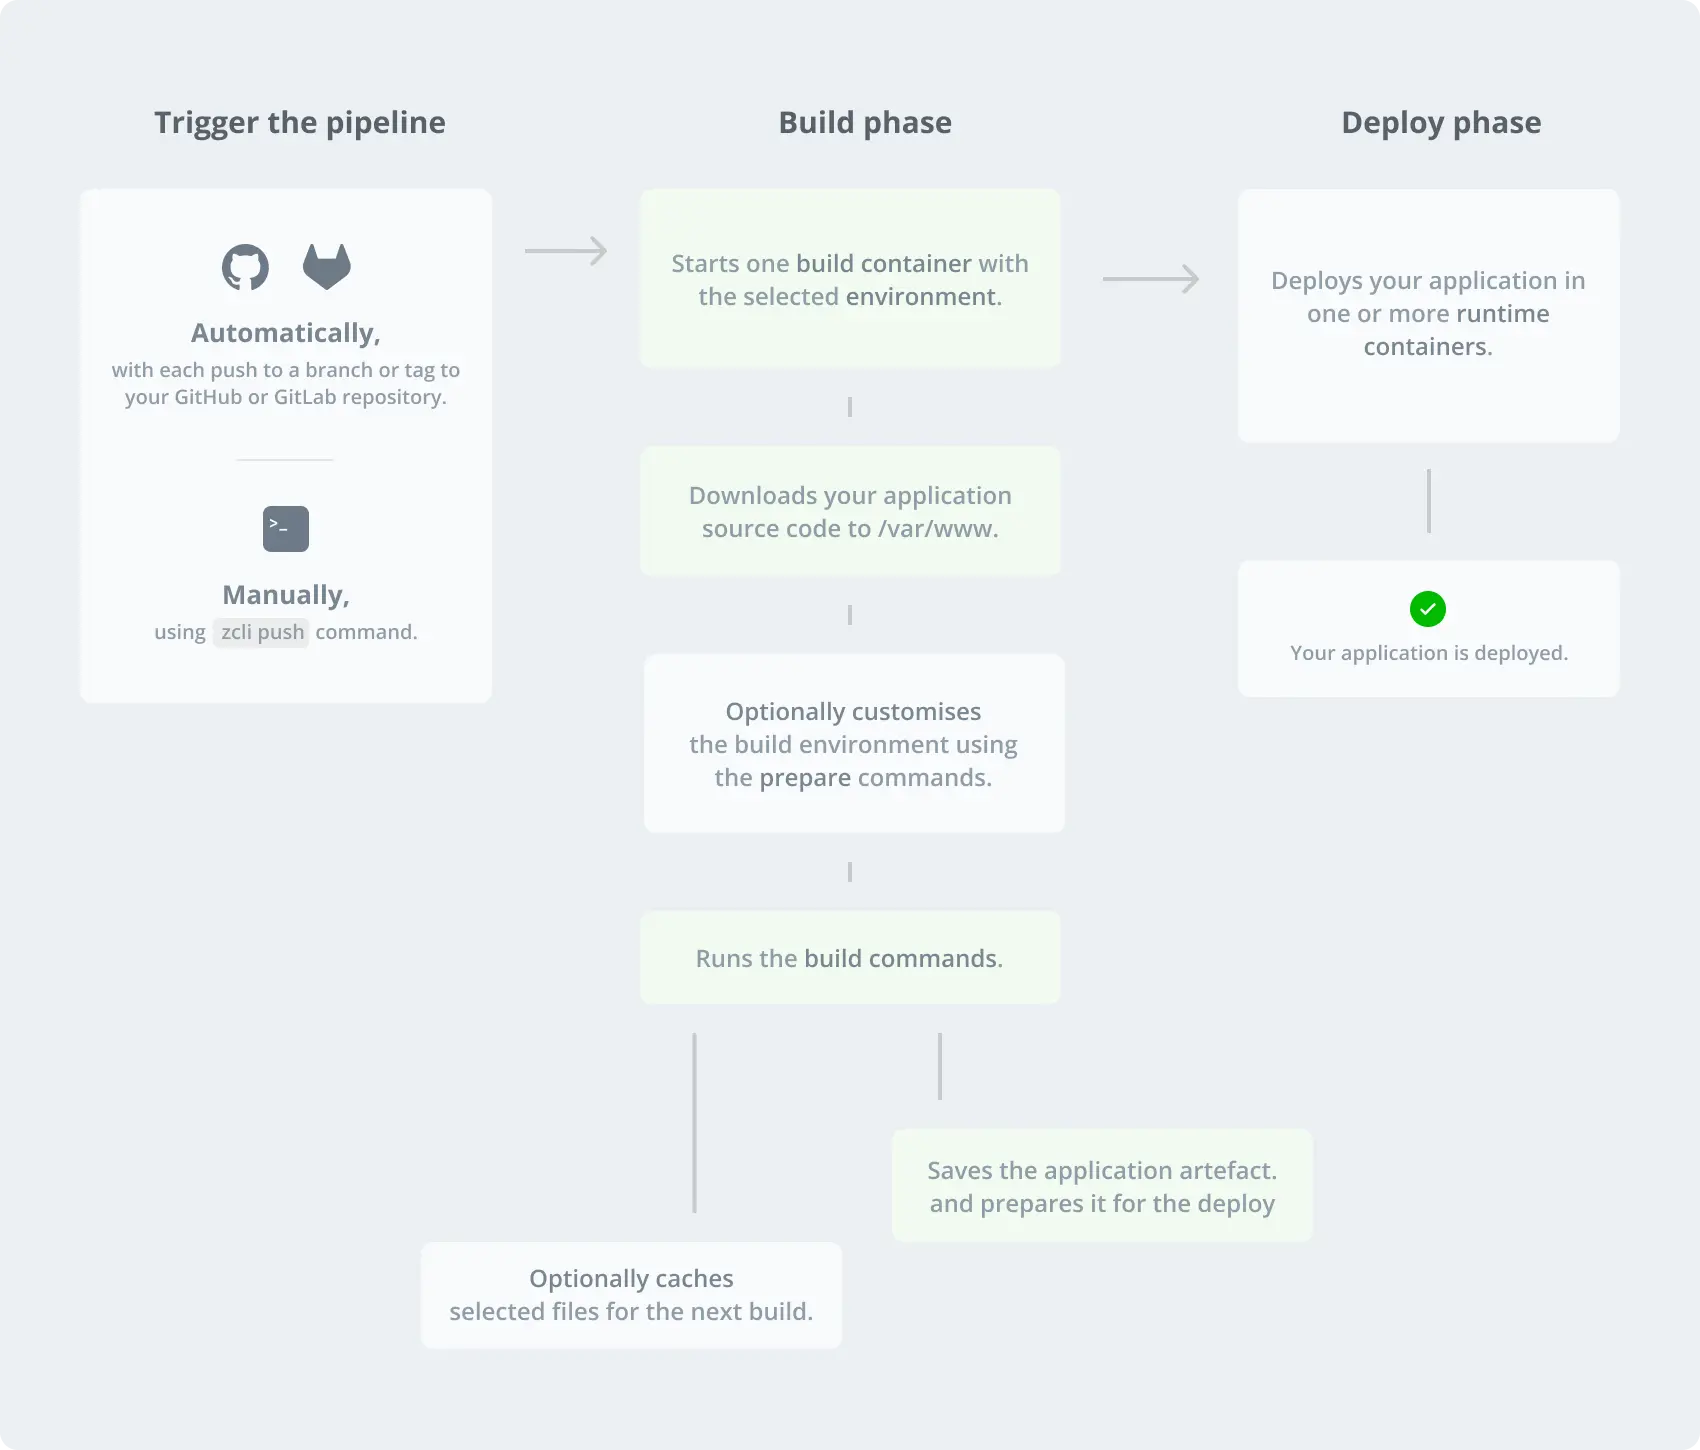
Zerops starts a temporary build container and executes these steps:
- Install build environment - Sets up the runtime and tools
- Download source code - From GitHub ↗, GitLab ↗ or via Zerops CLI
- Customize environment - Runs optional preparation commands
- Execute build commands - Compiles and packages your application
- Upload artifacts - Stores build output in internal Zerops storage
- Cache files - Optionally caches selected files for faster future builds
Zerops automatically deletes the build container after the build finishes or fails.
Build hardware resources
All runtime services use the same hardware resources for build containers:
| HW resource | Minimum | Maximum |
|---|---|---|
| CPU cores | 1 | 5 |
| RAM | 8 GB | 8 GB |
| Disk | 1 GB | 100 GB |
Build containers start with minimum resources and scale vertically up to maximum capacity as needed.
Build container resources are not charged. Build costs are covered by the standard Zerops project fee.
Build time limit
The entire build pipeline has a 1 hour time limit. After 1 hour, Zerops terminates the build pipeline and deletes the build container.
Customize the build environment
All runtime services start with a default build environment based on the build.base attribute in zerops.yaml. Install additional packages or tools by adding build.prepareCommands to your configuration.
Learn more about customizing build environments:
Runtime prepare phase (optional)
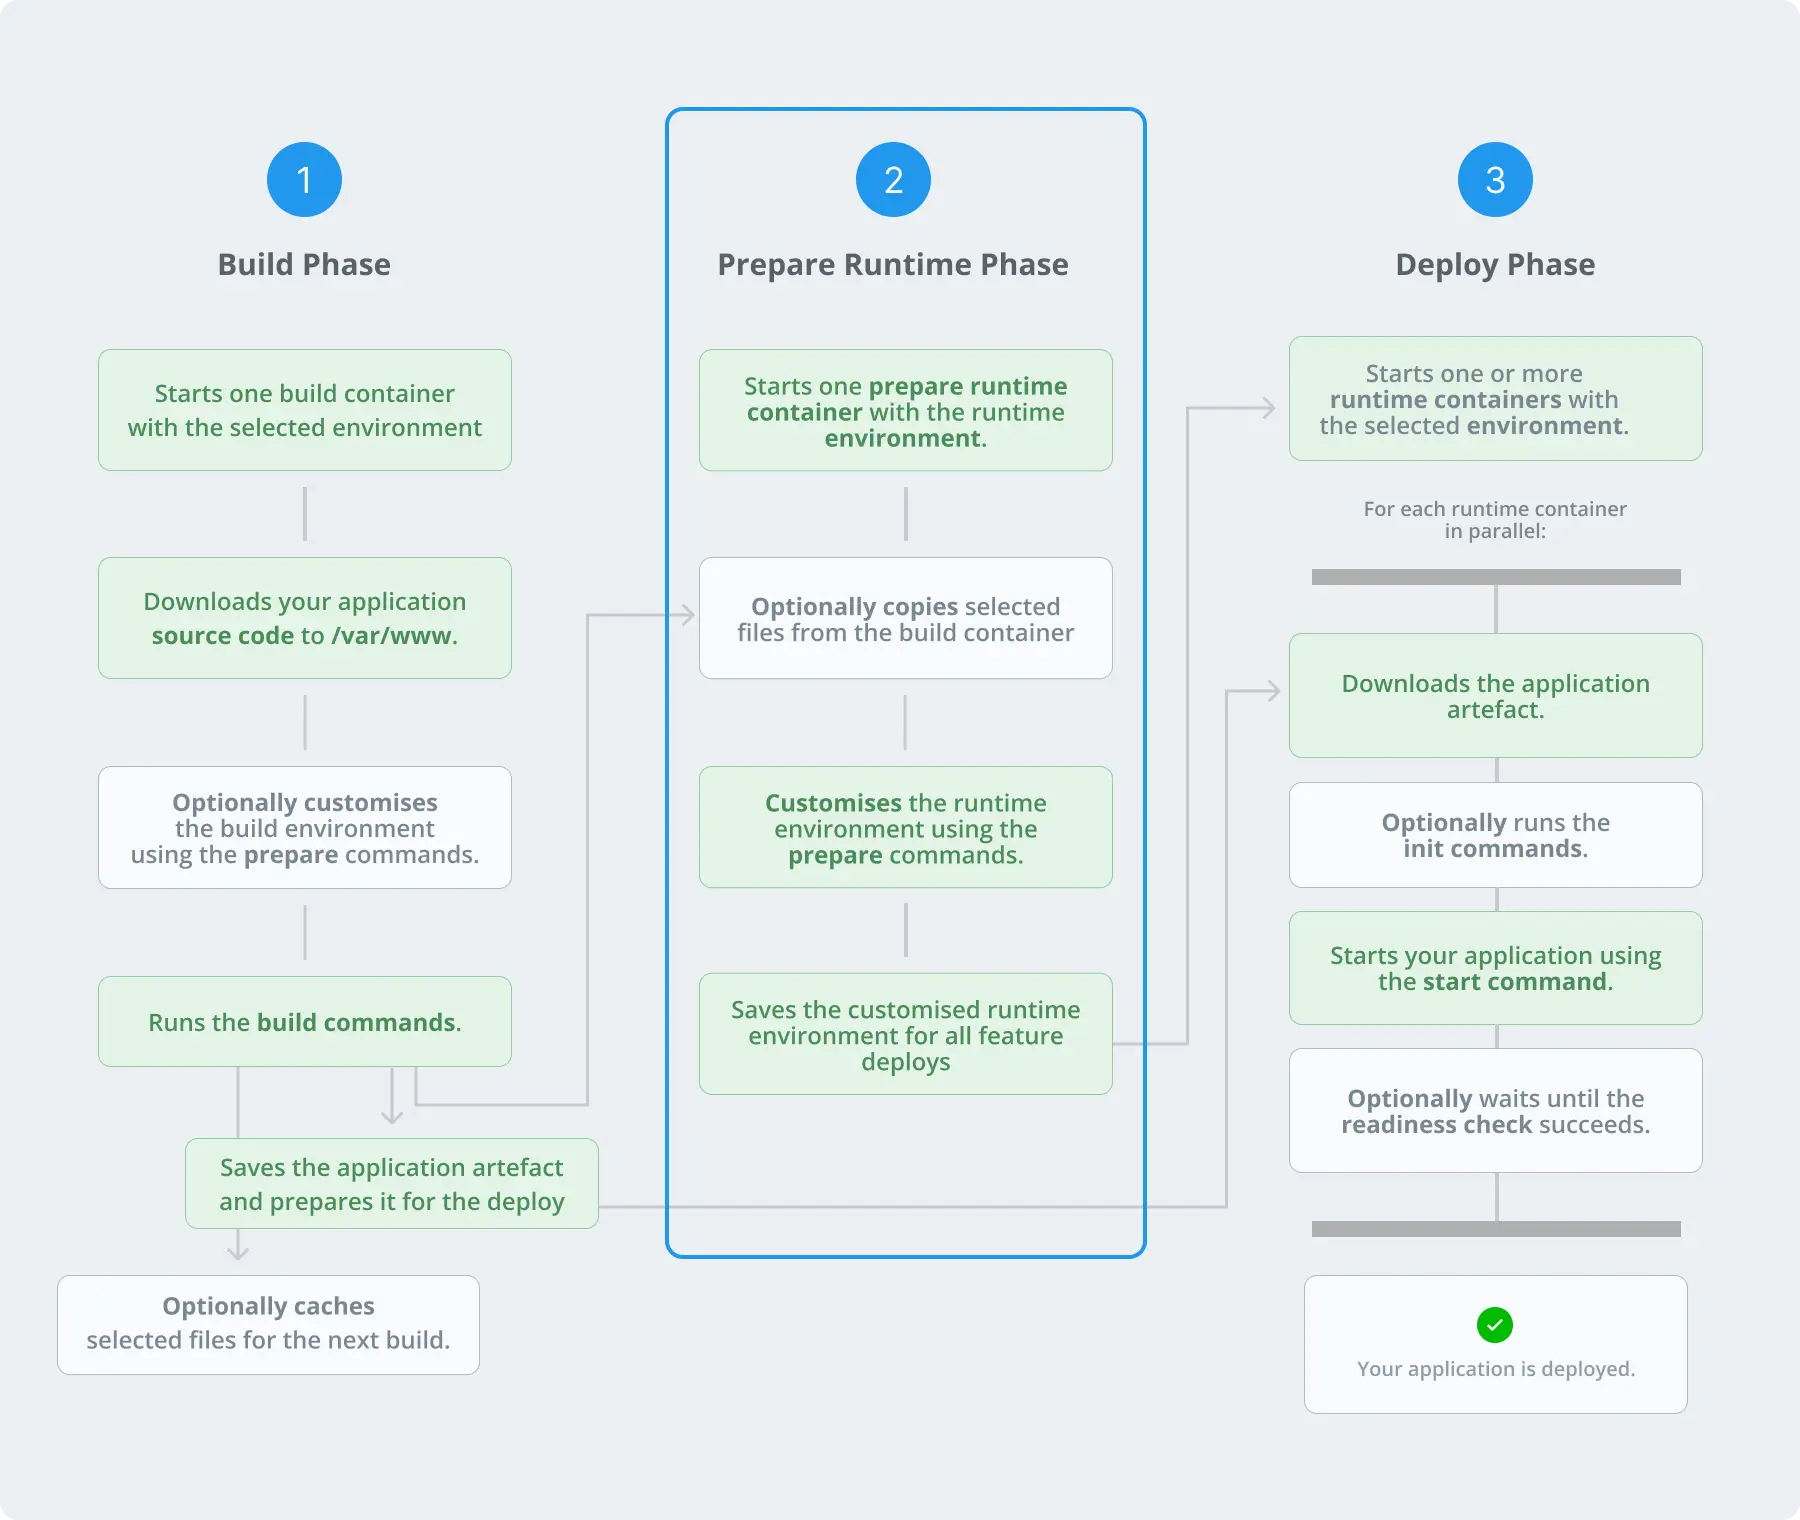
When your application requires additional system packages, libraries, or tools in the runtime environment, Zerops allows you to build a custom runtime image. This optional phase occurs after the build phase and before deployment.
When to use custom runtime images
Build custom runtime images when you need:
- System packages or libraries for runtime operations (e.g.,
sudo apk add imagemagickfor image processing) - Library dependencies for interpreted languages or dynamically linked binaries
- System-level tools or utilities your application requires
- Customized base operating system or additional software layers
Configuration
Configure custom runtime images in your zerops.yml file using these fields:
run.os + run.base
Specify the operating system and base packages for your custom runtime image:
run.prepareCommands
Define commands that customize your runtime image. These commands run inside a fresh base container:
Zerops creates the custom runtime image from this container after all commands complete successfully.
build.addToRunPrepare
Copy specific files from the build phase to the runtime prepare phase. This is useful when you need source files during runtime preparation:
These files are packed immediately after build.buildCommands finish and become available during the runtime prepare phase.
How it works
When you trigger the first deploy with defined run.prepareCommands, Zerops:
- Creates prepare container - Based on
run.osandrun.base - Copies build files - Files specified in build.addToRunPrepare (if any)
- Runs prepare commands - Executes run.prepareCommands in order
- Creates runtime image - Builds custom runtime image from the prepared container
- Uses for deployment - Deploys your application using this custom runtime image
Custom runtime image caching
Zerops caches custom runtime images to optimize deployment times. The runtime prepare phase is skipped and cached images are reused when:
- It is not the first deployment of your service
- None of these
zerops.yamlfields changed since the last deployment:run.osorrun.baserun.prepareCommandsbuild.addToRunPrepare
- File contents specified in
build.addToRunPrepareremain unchanged - The custom runtime image cache hasn't been manually invalidated
Manual cache invalidation
To invalidate the custom runtime image cache, go to your service detail in the Zerops GUI, choose Pipelines & CI/CD settings section from the left menu, and click on the button under Pipeline #. Then click on the Clear runtime prepare image button.
Learn more about building custom runtime images:
Do not include your application code in the custom runtime image, as your built application code is deployed automatically into fresh containers.
Shared storage mounts are also not available during the runtime prepare phase.
Deploy phase
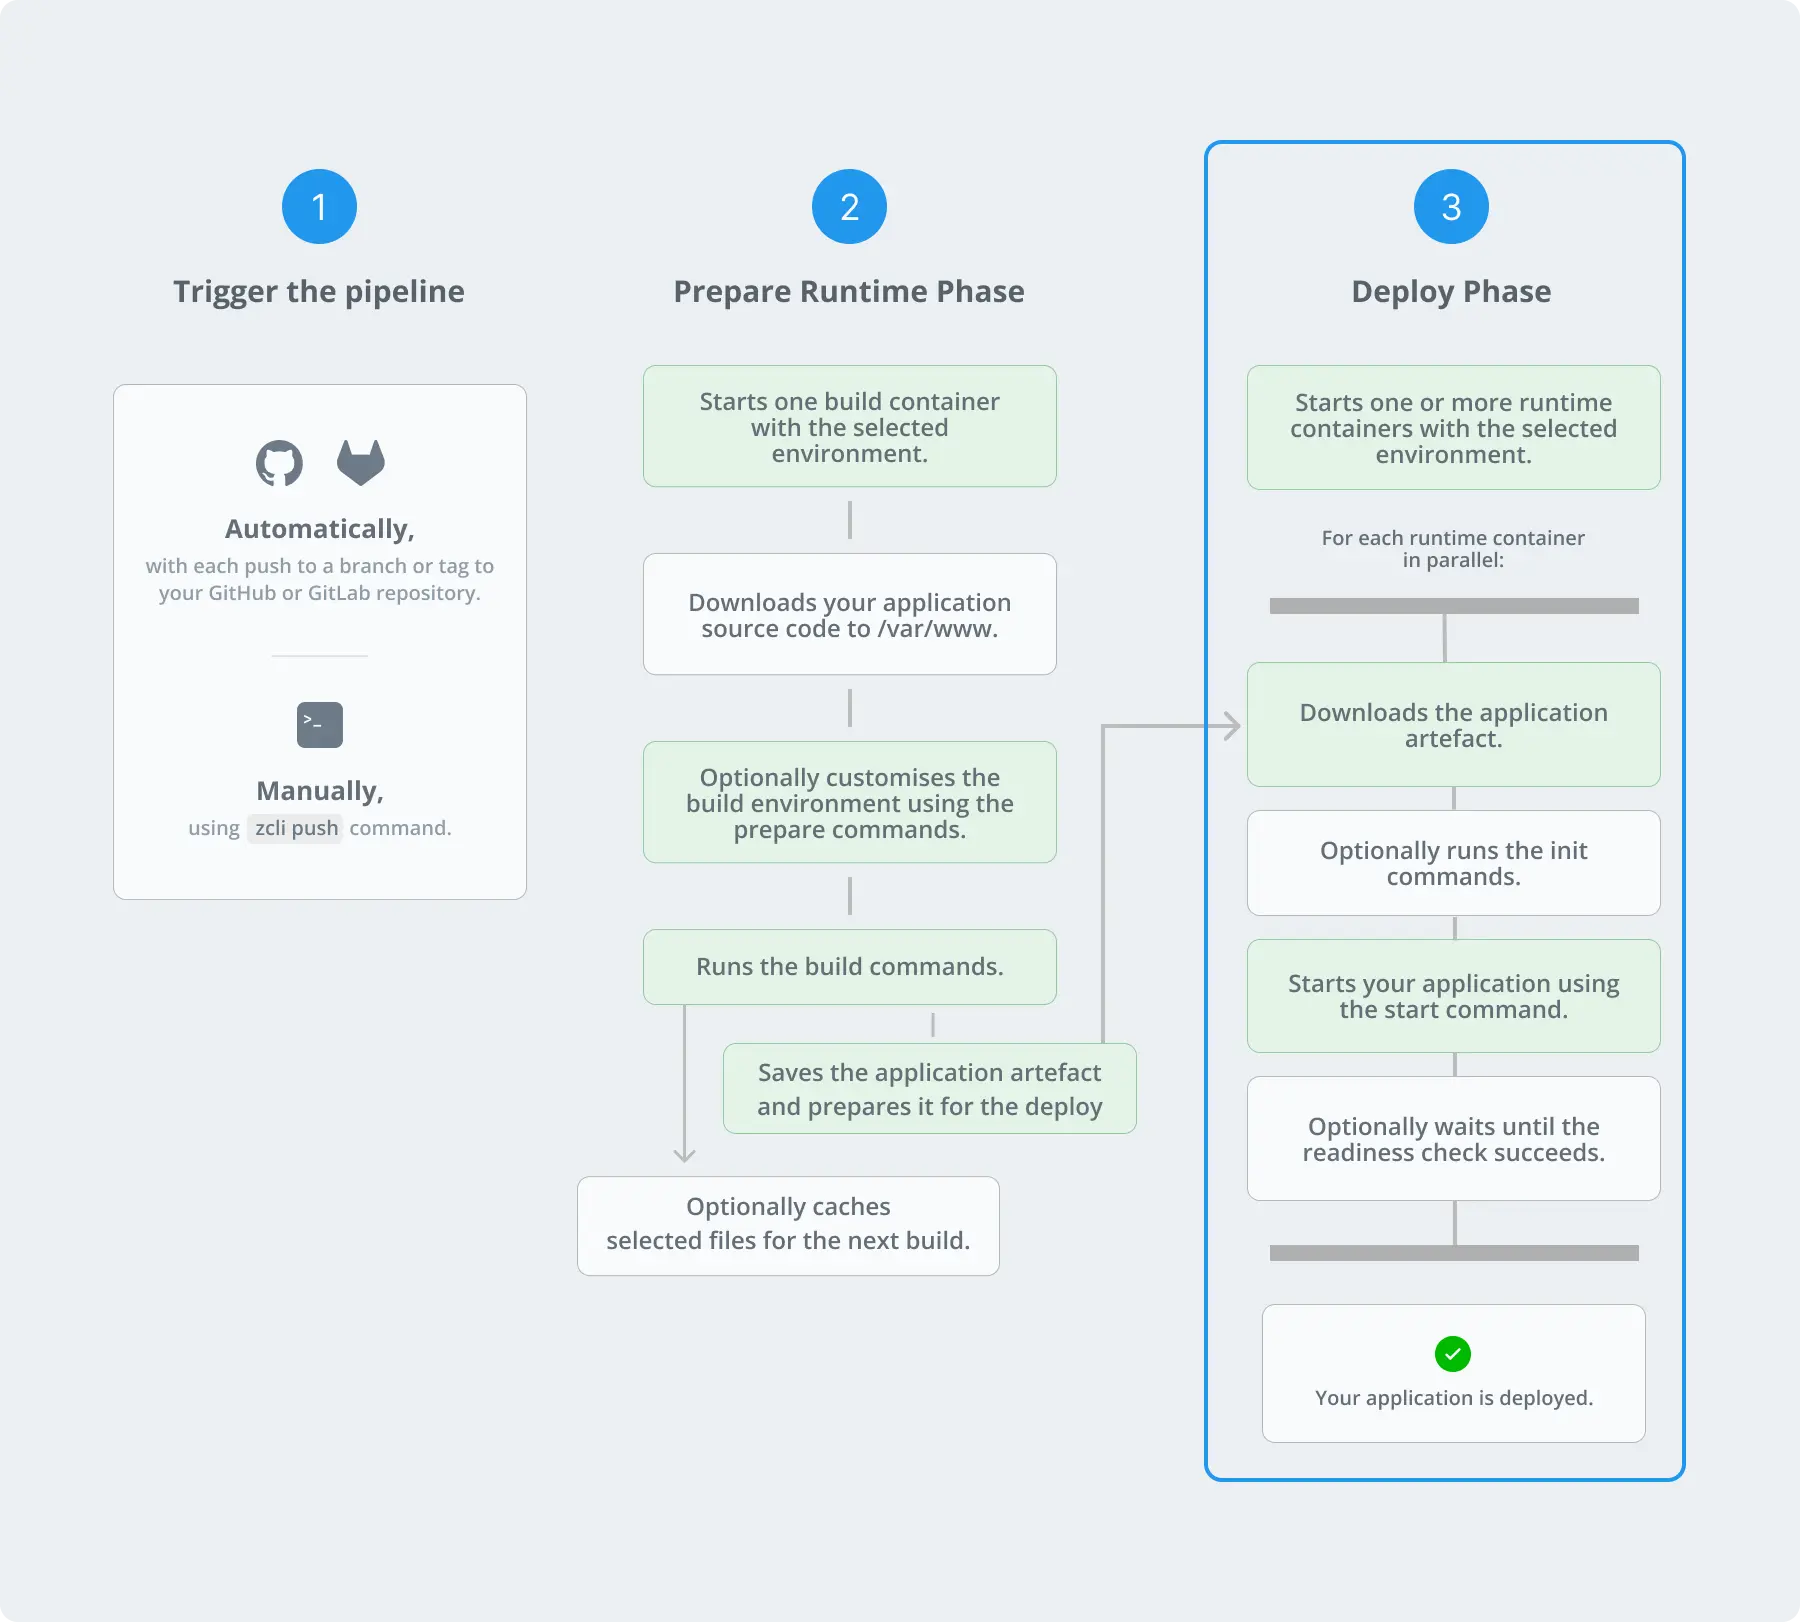
Application artifacts
After the build phase completes, Zerops stores the application artifact in internal storage and deletes the build container.
For manual deployments using Zerops CLI, the application artifact is also uploaded to internal storage.
Zerops uses the stored artifact to deploy identical versions of your application whenever a new container starts:
- During new application version deployments
- When applications scale horizontally
- When runtime containers fail and new containers start automatically
First deploy
For initial deployments, Zerops starts one or more runtime containers based on your service auto scaling settings.
Zerops executes these steps for each new container:
- Install runtime environment - Sets up the runtime (or uses a custom runtime image if configured)
- Download application artifact - Retrieves build output from internal storage
- Run initialization - Executes optional init commands
- Start application - Launches your app using the start command
- Check readiness - Waits for readiness check to succeed (if configured)
- Activate container - Container becomes active and receives incoming requests
Services with multiple containers deploy in parallel.
If your application needs initialization in each runtime container, add init commands to zerops.yaml.
Do not use initCommands for runtime environment customization. See how to build custom runtime images.
Subsequent deploys
For applications with existing running versions, Zerops starts new containers matching the count of existing containers.
Zerops executes the same steps as the first deployment for each new container. Your service briefly contains both new and old versions during this process.
Old containers are then removed from the project balancer to stop receiving new requests. The processes inside old containers terminate and Zerops gradually deletes all old containers.
Readiness checks
If your application is not ready to handle requests immediately after starting via the start command, configure a readiness check in your zerops.yaml.
When readiness checks are defined, Zerops:
- Starts your application
- Performs readiness check
- Waits and retries - If check fails, waits 5 seconds and repeats step 2
- Activates container - If check succeeds, marks container as active
Runtime containers with pending readiness checks do not receive incoming requests - only active containers handle traffic.
If readiness checks fail for 5 minutes, Zerops marks the container as failed, deletes it, creates a new container, and repeats the deployment process.
Readiness check types:
httpGet- Succeeds when URL returns HTTP2xxstatus (5-second timeout, follows3xxredirects)exec.command- Succeeds when command returns status code 0 (5-second timeout)
Read the runtime log to troubleshoot failed readiness checks.
Manual deploy using Zerops CLI
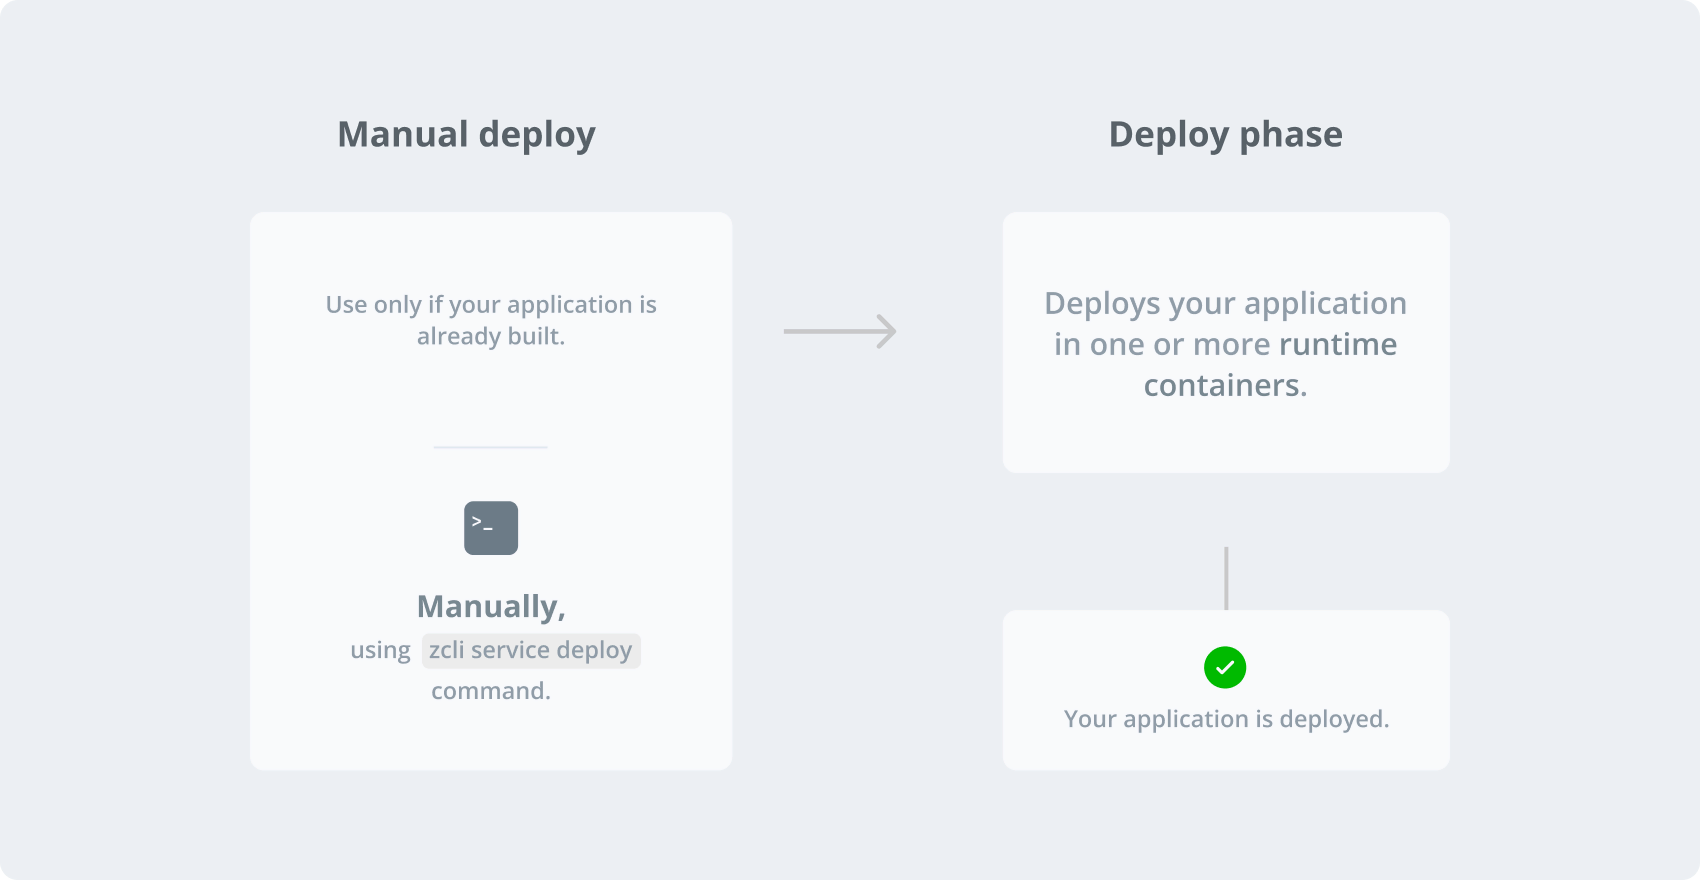
Start deploy-only pipelines using the Zerops CLI. The zcli service deploy command uploads and deploys your application in Zerops. Use this when you have your own build process. For building applications in Zerops, use continuous or on-demand deployment instead.
Usage:
  zcli service deploy pathToFileOrDir [flags]

Flags:
      --archive-file-path string   If set, zCLI creates a tar.gz archive with the application code in the required path relative
                                 to the working directory. By default, no archive is created.
      --deploy-git-folder          Sets a custom path to the zerops.yaml file relative to the working directory. By default zCLI
                                 looks for zerops.yaml in the working directory.
  -h, --help                     the service deploy command.
      --project-id string         If you have access to more than one project, you must specify the project ID for which the
                                 command is to be executed.
      --service-id string         If you have access to more than one service, you must specify the service ID for which the
                                 command is to be executed.
      --version-name string       Adds a custom version name. Automatically filled if the VERSIONNAME environment variable exists.
      --working-dir string        Sets a custom working directory. Default working directory is the current directory. (default "./")
      --zerops-yaml-path string    Sets a custom path to the zerops.yaml file relative to the working directory. By default zCLI
                                 looks for zerops.yaml in the working directory.
pathToFileOrDir defines paths to directories and/or files relative to the working directory. The working directory defaults to the current directory and can be changed using the --working-dir flag.
Place zerops.yaml in the working directory.
You can modify the deploy pipeline anytime by updating the zerops.yaml in your working directory.
Manage builds and deployments
Cancel running build
When you need to cancel an incorrect running build, use the Zerops GUI. Go to the service detail, open the running processes list, and click Open pipeline detail. Then click Cancel build.
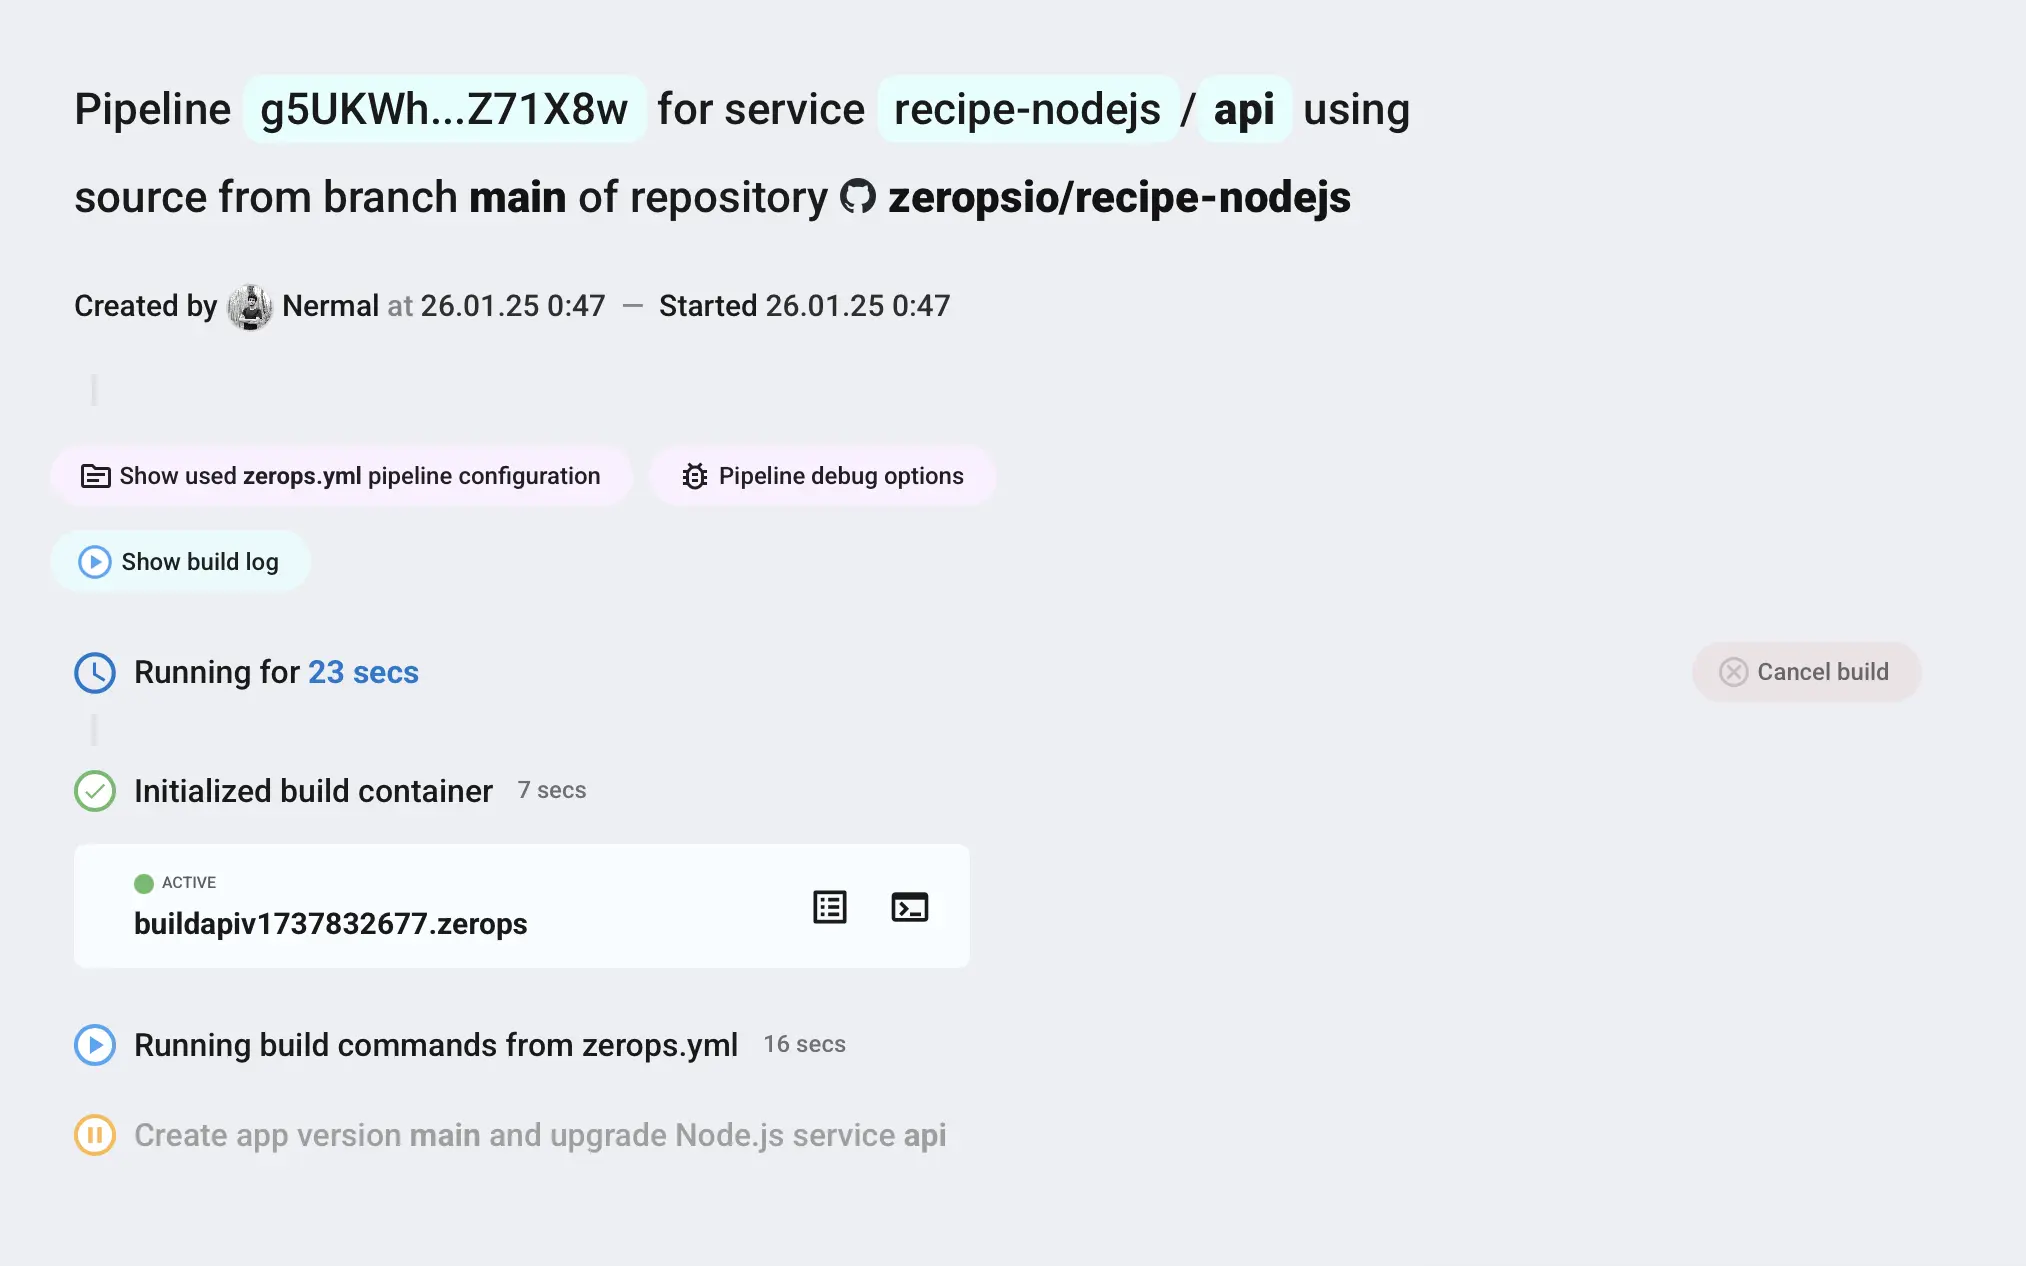
Build cancellation is only available before the build pipeline finishes. Once the build completes, deployment cannot be cancelled.
Application versions
Zerops keeps the 10 most recent versions of your application in internal storage.
Access the application versions list in Zerops GUI by going to service detail and choosing the Pipelines & CI/CD settings section from the left menu. The active version is highlighted - click the button below to show all archived versions.
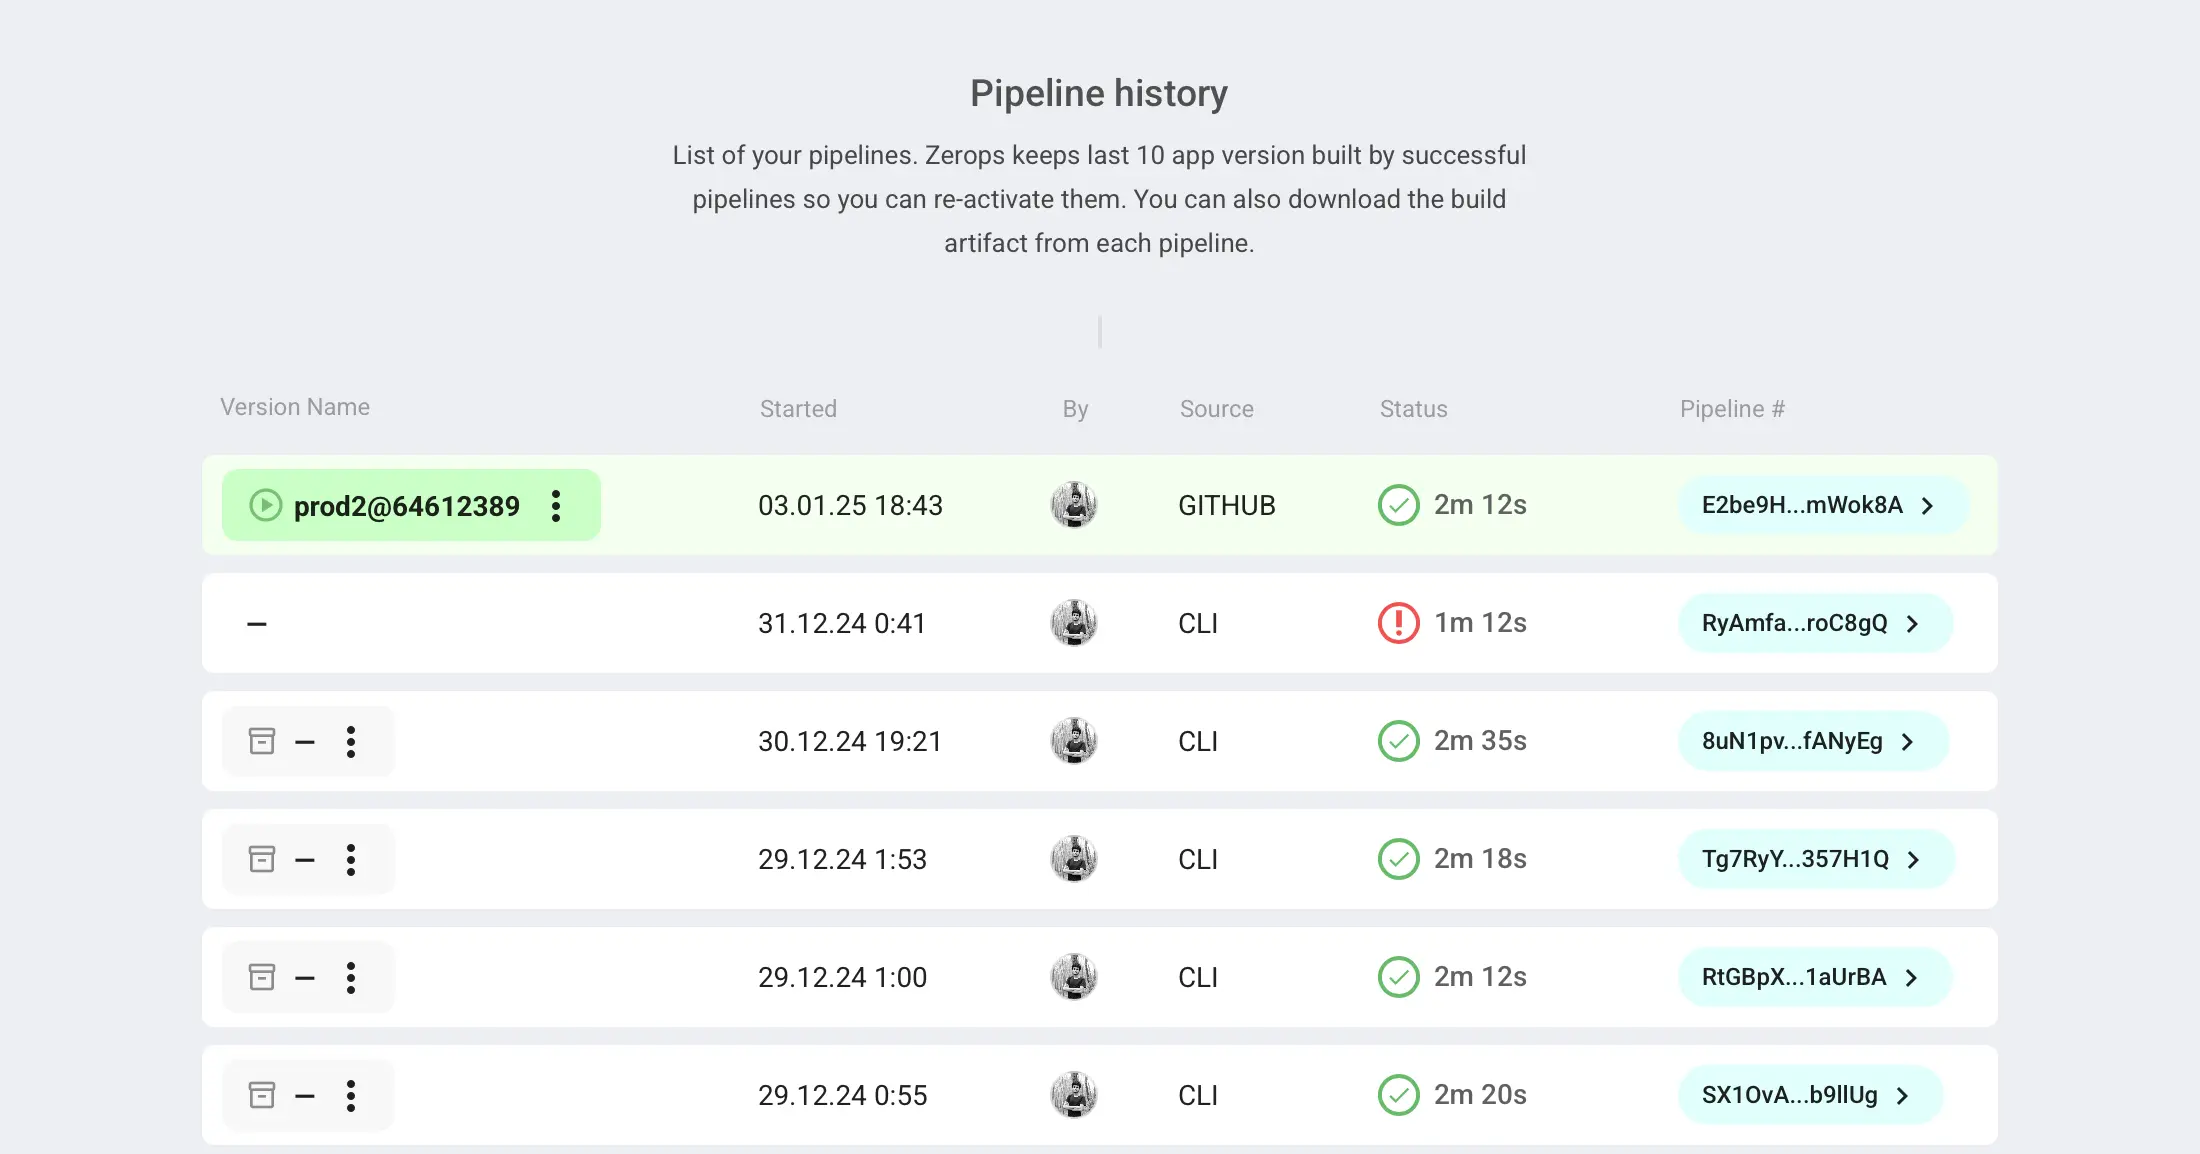
Access pipeline details from the additional menu. Pipeline details contain:
- Pipeline configuration (
zerops.yaml) used for the selected version - Build log (if available)
- Prepare runtime log (if available)
You can download the build artifact for selected versions or manually delete inactive versions.
Restore an archived version
Restore archived versions by choosing Activate from the additional menu. Zerops will deploy the selected version and archive the currently active version.
Environment variables restore to their state from the last moment when the selected version was active.